Monday, January 3, 2011

Java Tutorial #19

0
Introduction to Multidimensional Arrays
Java also allows two dimensional and multidimensional size arrays. And the simplest form of multidimensional array is the two dimensional array. Its general equation is:

Type array_name[1st Index][2nd Index] = { {a, b, c } , {d, e, f} };

Where: 1st index is the number of row, 2nd index is the number of column. a, b and c are the elements of the first row (which is row 0) and d, e and f are the elements of the second row (which is row1).

Note: All index start counting from 0.

Ex.

int input[ ] [ ] = { {1, 2, 3} , {4, 5, 6} };

Just look at the table below.


Array “input”
Column 0
Column 1
Column 2
Row 0
1
2
3
Row 1
4
5
6

The table represents the array input. The array “input” is a two-dimensional array. It composed of many elements found on a separate row and column. Unlike the single dimensional array which contains a columns only. The array initializer above is also the same to this one.

input[0] [0] = 1;                                                input[1] [0] = 4;
input[0] [1] = 2;                                                input[1] [1] = 5;
input[0] [2] = 3;                                                input[1] [2] = 6;


Just look at the table, the values above and the array initializer. You will get it by looking to those things.


Sunday, January 2, 2011

Java Tutorial #18

0
Java’s enhanced for Loop
Java developed a special for loop for array application is it is called the enhanced for loop. The enhanced for loop will take two arguments unlike the traditional for loop which is taking three arguments. Java developed a special for loop for array application. Its general equation is:

for (type identifier: name_array)

Where: type is the data type, identifier is a variable that will store value in the array every time the loop is going through. For example

input[ ] = {6, 2, 3, 4, 5};

identifier will hold 6, then it will hold 2, and later it will hold 3. Everytime the loop is going through, it hold the value in the array one at a time. For example

for (int var: input);

var is the identifier of the array input.

Consider this program:


First, I declare an array named “"input" and I declare a variable then initialize it to zero.
"sum" will hold the value each time the values are added. I created an enhanced for loop. I use "var" to hold each element in the array and I included the name of the array. The formula will add 0 to the first value in the array, then it will add the outcome of the previous operation to the second value in the array. Later, It will add the outcome of the previous operation to the third value until it reach the last value in the array. At last, it will display the sum of all the values in the array. This is the output.


Java Tutorial #17

0
Application of Array in Tables
Consider this program.


In the example, I declare a String array (Array Name and Nick). I created a loop that will automatically go to each item in the array. This will count how many items in each array.
Here's How:  First, create a variable that will serve as the index. Initialize its value to 0. Second, set a condition that this value is greater than the size of the array. The keyword .length is a special java function reserve for the counting the elements inside an array (initializer).
Now, index=0, and it is greater than the elements in the array "Name". The next step is to increment the variable index. So, index=0, will count from 0 to “how many elements in the array "Name", and will increment 1 to its value (the values will increase one value).
The next step is outputting the index (plus a tab space) and the value of the array. Since the variable "index" is created to count how many elements in the array are, we can now use it as index  of the array "Name". What the for loop does is.. it will go through each elements of the array (it will take all of the elements inside that array). IT WILL OUTPUT THIS ONE. I UNDERSTAND YOU IF YOU DON'T UNDERSTAND THIS ONE. I THINK THIS IS ONE OF THE DIFFICULT PARTS OF JAVA AND ALSO THE C++. AND I PERSONALLY HATED THIS PART. SO, I DON'T SPEND MORE WORDINGS TO IT. I PERSONALLY UNDERSTAND IT. I TRIED MY BEST TO EXPLAIN IT FOR SOME DUMMY OUT THERE.


Java Tutorial #16

0
Introduction to Arrays
Array - it is a variable that contains many values. It can store values with the same data type.
-It is a collection of variables of the same type that are referenced by a common name.
Syntax
Type var_name [ ] = new Type[Size];
Where: “var_name” is the name of the array, Type is the data type, and Size is how many elements this array will hold.
-All arrays have 0 as the index of their first element. So, If you declaring
int input[ ] = new int [9];
-You are declaring an integer array that has 10 elements, input[0] through                                input[9].  

Assigning values to each items in the array
The first way of assigning values to each array's item is by writing the values one by one. You can assign a value to each of the elements by writing this.

var_name[index] = some_value;

For example,

input[0] = 67;

This will assign “67 as the value of the first element in the array. (NOTE: THE COMPUTER STARTS COUNTING FROM 0 TO SOME_VALUE.) The subscript “0 is called an index and “input is the name of the array. The index is simply a system of numbering items in the arrays content. So, If you like to assign a value in the second element, you will write 1 as index.

The second way of assigning is called “Array Initializer”. This will initialize a value to each element without typing the array name and the index value. By writing this,

int input[ ] = {2, 7, 8, 93, 83};

You don't have to spend much of your time to declare the array's size and index. This will assign“2 as the 0 element and “83 as the 4 element. Initializers will automatically counts how many element you put in the array and this will also automatically assign an index to each of the element. “2 is input[0], “7 is input[1] and so on.

Dislaying Array’s Element
TO DISPLAY: 
Simply call out the println function and concate it with some string.
Just write the name of the array and the index of the element in the array.
 Consider this Example. These programs will use both of the ways of displaying Array's Element.

By using the first way:


By using the second way:


The output:


Sunday, December 26, 2010

Java Tutorial #15

0
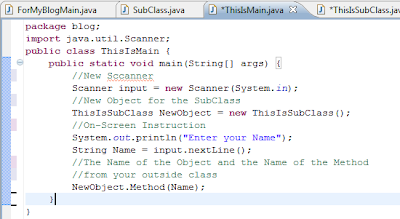
Accessing method (with an argument inside the parameter) into another class

Again, the first thing to do is to create a new subclass.  Of course, that subclass will hold a method that later will be implement to our main class.  In order to understand this topic you must knew already how to make a method and that is recently explained in the previous topic.  So, I recommend everyone to read the previous topic before this one.
This method will hold an argument inside its parameter.  When a method is about to use a variable, the type of that variable must be declared inside the parameter of that method.  That is called an argument. "String " is the variable's data type and "Name" is a variable's name.
Consider this example


In this example, the method called “Method” will be using the variable “Name”.  So, in order to use that variable the method must declare the “Name” data type.  The type and the name of the variable will be placed inside the parameter of the Method and it is called an argument.
“It is an extra data needed by the method in order to work”, bucky said.
That method will simply print the word “Hello” plus the variable “Name”.  The argument specifies that the variable “Name” is a string.
 Back to the main class, import and create a new Scanner and create a new object.  Then, print an instruction to the user.  Use the method, you created from the subclass.


The Output


Java Tutorial #14

0
Accessing a method (with empty parameter) into another class
                                 

 First thing to do is to create a new class (sub-class. If you already have your main class) 
You can do this by clicking the new class icon in the toolbar then choose "Class".
In the Dialog Box, uncheck the check box with the option of "public void static main(..)" then Finish.


In the SubClass.

Then create a new method.  A Method is a function inside your program.  It is like a little sub-program inside your main-program.  You can type actions and bunch of codes inside this method.


public means that all of the class can use this method. This can be replace by private which means that only that class can use the method. But, in this case, we don’t need to do that.
void means that the method will gonna do something but it will not return any data at all. This can be replace by any data types you want to associate with your method.  e.g. String if the method will return a string value.  int if the method will return an integer value.
MethodName( ) is any name you want to associate with your method. In this case, we will not put a parameter inside that method.


In the Main Class.


After creating your method, go back to your main class.  Then connect your main class to your sub-class. This can be done by creating an object that will hold the data from your subclass to the main class. Here’s how:

First indicate the name of your subclass. 
Create an Object. You can assign any name for your Object Name. 
Put an equal sign and type the word “new”, the name of your subclass and put an empty bracket.


Then you can now use the method declared. By using the Object you previously declared and the name of the method you created from the subclass.


After that it will output this one. It will do the command you created from the subclass.


Wednesday, December 1, 2010

Java Tutorial #13

0
Do-While Loop in Java
It will first execute a body of codes before testing for a condition.  Its general equation is:

do{
statements;
}while(condition);

Where:
condition = is where the loop will stop.

You maybe find this very similar to the while loop (because I use the same problem) but as we move on you will see their differences.  But for now, the obvious difference is that the while loop will test first for a condition then execute a command while do-while will execute a command first before testing for a condition.  Consider this example.